Table of Contents
Contents
Launching
IF YOU ARE NOT YET A QUALIFIED WINCH DRIVER: YOU CANNOT LAUNCH A GLIDER UNLESS YOU ARE UNDER THE DIRECT SUPERVISION OF A QUALIFIED WINCH DRIVER WHO HAS BEEN AUTHORISED TO SUPERVISE TRAINEES.
Initial Radio Call
Base — Winch, Base, K21 on the North cable.
Winch — K21, North cable.
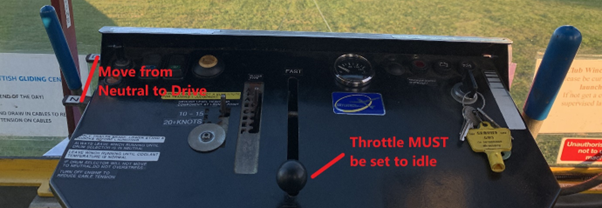
Upon receiving the first radio call, you should start the winch and ensure that it is warm enough to launch. Do not move the drum selector or put the winch into Drive yet.
If the requested cable does not make sense (e.g., requesting the ‘remaining cable’ when there are two cables out or the cable the launch point is using is not the one you expected), request the launch point to confirm the cable again.
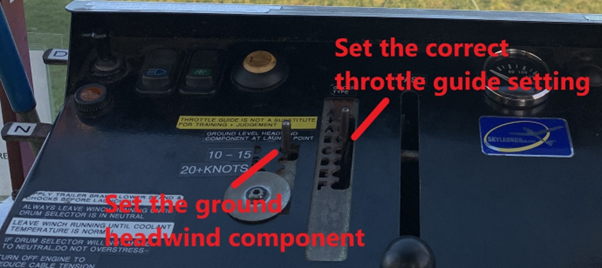
Check the throttle guide setting sheet for the appropriate launch characteristics of the glider you are launching. Set the appropriate surface wind component and throttle guide setting.
Check that there are no obstructions near the winch cables, such as recently landed gliders or the tow plane. If there is, tell the launch point that you want to wait for them to clear.
Scan both the left- and right-hand circuits for possible conflicting traffic. Remember that, if a glider has passed perpendicular to the launch point, a launch cannot be started.
Consider what the launching glider may do in the event of a launch failure and whether traffic joining the circuit may be affected. On light wind days, also consider that the tug may land on a reciprocal heading (towards the glider being launched).
Take Up Slack
Base — Winch, TAKE UP SLACK.
(Do not respond)
If there is a substantial delay between the initial call and ‘TAKE UP SLACK’:
Ask the launch point to confirm the glider type and cable again. Avoid prompting them to provide a ‘yes’ or ‘no’ answer.
✅ Good: ’Confirm glider type and cable?’
❌ Avoid: ‘Confirm K21 on the North cable?’
Select the correct drum depending upon the winch’s orientation. Usually, this will either mean the ‘north’ or the ‘south’ drum. In unusual airfield configurations, the drums could however be ‘east’ and ‘west’.
Once you have confirmed that the take up slack light signal is slowly flashing, put the winch into Drive. You should now be fully focused on the light.
IF THE LIGHT TURNS SOLID OR YOU HEAR “STOP” OVER THE RADIO:
Cut the power IMMEDIATELY. Do not wait to see/hear the other signal.
All Out
Base — Winch, ALL OUT.
(Do not respond)
The signal light will begin to quickly flash.
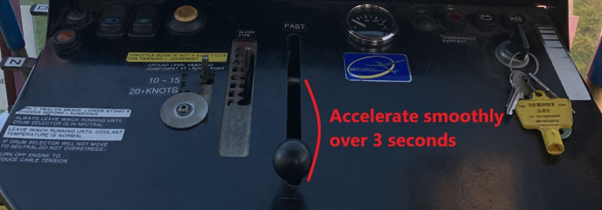
Over a period of around 3 seconds, steadily increase power to the required level. This often may be the throttle guide, but the glider may require more or less power depending on the conditions. Remember: the throttle guide is a guide , not an absolute solution. You can always push through the guide if you need more power.
Keep in mind that lighter gliders such as the Libelle, K6 and K8 will come off the ground rather quickly with a relatively low power setting. Likewise, heavy gliders such as the DG1000 and Arcus require considerable power to take-off, often requiring nearly full throttle. Don’t jerk the glider forward during acceleration.
Once you have sight of the glider, allow it to rotate into the full climb – this should take 3 to 5 seconds. Once the glider is climbing, use your best judgement and adjust the throttle as necessary. Some good indicators to look for include:
- Signals from the glider — If the glider is TOO SLOW, it will LOWER ITS NOSE. If the glider is TOO FAST, it will WAG ITS TAIL.
- Rate of climb — Monitor the rate that the glider is climbing up the cabin’s window.
- Bow in the cable — There should be a slight bow in the cable. If it is dead-straight, you are likely going too fast!
During the full climb, if you have gotten everything right, you shouldn’t need to adjust the throttle that much. As the glider gets higher up the launch, gradually start backing off the power. Well before the glider passes overhead the winch, cut the power completely.
IF THE GLIDER DOES NOT RELEASE: IF YOU SUSPECT THAT THE GLIDER WILL NOT RELEASE, REMOVE THE GUILLOTINE LOCK. IF YOU LOSE SIGHT OF THE GLIDER OVERHEAD THE WINCH, SELECT NEUTRAL AND PULL THE GUILLOTINE ALL THE WAY TOWARDS YOU. BOTH CABLES WILL BE CUT. APPLY THE BRAKE. WHEN ABLE TO AND IF SAFE TO DO SO, CALL THE GLIDER OVER THE RADIO TO ADVISE THEM THAT THE CABLE WAS CUT AND THEY MAY HAVE TRAILING CABLE STILL ATTACHED. You should never need to use it, but DO NOT BE AFRAID TO USE THE GUILLOTINE.
The Pressure Gauge
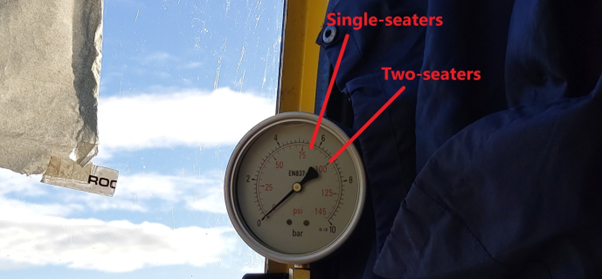
The pressure gauge shows the amount of pressure that the cables are placing on the winch’s transmission. It can be a good indicator of how well a glider is being launched.
For single seaters, a pressure of 75 to 80 PSI should be reasonable. Likewise, for a two-seater, 90 to 100 PSI should be reasonable. The pressure may vary greatly depending on the weight of the glider being launched. Weak link strengths can be a good indication of the pressure levels you should expect. Exercise your best judgment.
If the pressure starts to exceed 110 PSI, start to lower the throttle. If the pressure exceeds 115 PSI, the glider is likely pulling back too hard, and you should consider cutting the power (causing a launch failure) to avoid a cable break. At high pressure levels, you may also feel the winch shaking slightly – this is an indication that you should slow down!
The pressure gauge should be ignored until the glider is established in the full climb.
Launch Assist
The winch is fitted with a Launch Assist receiver. The club gliders, and a few private ones, are fitted with a special transmitter which broadcasts the glider’s indicated airspeed (IAS) during a winch launch. Keep in mind that you should not try to chase the speedometer and it can be up to 2 seconds out-of-sync.
Most gliders are not fitted with Launch Assist. Launch Assist does NOT use FLARM!
Club Aircraft Fitted with Launch Assist: LOV, JGJ, LZS, FUS, HHD
Note: WA1 and GBB do not have Launch Assist fitted.
Once The Glider Has Released
As soon as you have seen the cable start to fall from the glider, smoothly increase the power to bring the cable back to the winch. Maintain slight tension on the cable.
Do not put yourself under pressure. Allow the parachute and strop to hit the ground with a little power, then, in a controlled manner, bring them back to the winch. You should aim to have the parachute hit the ground around 50 metres from the winch.
IF HITTING AN OBJECT IS INEVITABLE: CUT THE POWER AND APPLY FULL BRAKE BEFORE THE IMPACT. DO NOT PULL THE CABLE THROUGH TREES, BUSHES, FENCES OR OTHER OBSTRUCTIONS.
As the parachute nears the winch, set the winch to Neutral and use the brake to bring the parachute to a smooth and gentle stop. Move the drum selector back into the middle.
Allow the winch to idle for a few seconds before turning it off.


