Table of Contents
Contents
The Skylaunch 2
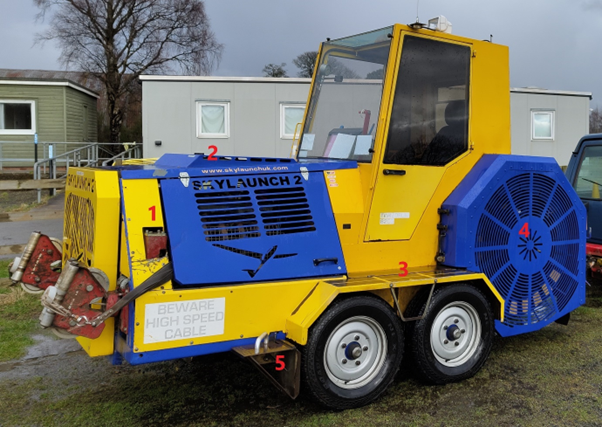
Exterior — Where Is Everything?
1. Guillotine — Each cable has its own guillotine. It is a relatively sharp piece of metal attached to a large spring which is held under compression. The guillotine is only used when the glider is unable to release the cable and is activated by the winch driver using the large red handle in the cabin. Operating the handle cuts both cables at the same time.
2. Coolant Reservoir Cap — The coolant levels can be inspected (and increased if necessary) by opening the coolant reservoir cap. Be careful not to cross-thread this cap when replacing it – it is surprisingly easy to do! Do not open the reservoir after the winch has been running!
3. Cable Inspection Flap — The cable can be inspected by opening this flap. It must be closed whilst the winch is in gear.
4. Cable Drum — The drum can be inspected by releasing the two fasteners on the forward-facing side. You can move the drum by hand if necessary. The drum’s guard must be in place whilst the winch is in gear.
5. Chocks — The chocks must be placed down before the first launch. If not, you may find the winch will start to move!
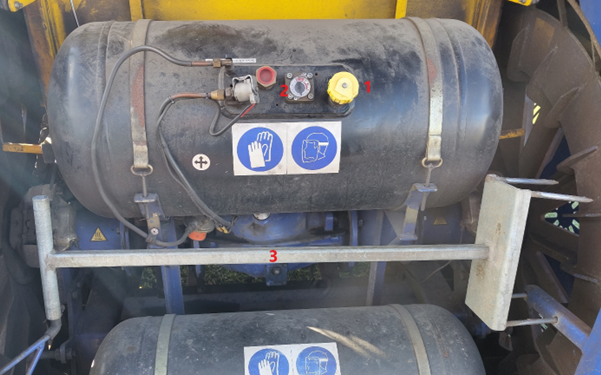
1. Fuel Cap — This cap covers the LPG tank’s valve. It should be kept on apart from when refuelling the winch.
2. Tank Pressure Gauge — This gauge shows the current pressure in the LPG tank.
3. Earthing Stake — The earthing stake should be placed into the ground and connected to the winch during launches. It is primarily used to discharge any static electricity that may build up (for example, from the Dyneema cable rubbing against itself and the drum, or friction from the air during launches).
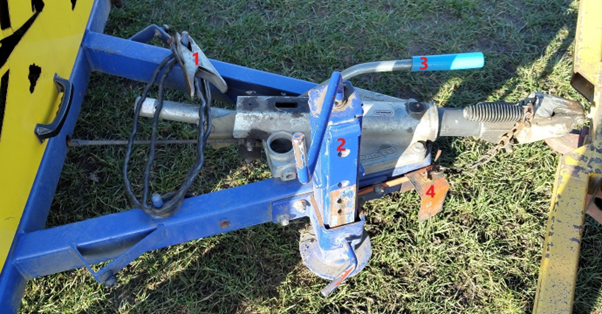
1. Earthing Clamp — This should be attached to the earthing stake. See above.
2. Jockey — This should be used to raise and lower the winch on and off the retrieve vehicle. A piece of wood should be placed underneath the jockey when it is in use to prevent causing damage to the field – this can be found in the winch’s cabin.
3. Handbrake — This engages the brake fitted to the winch’s wheels.
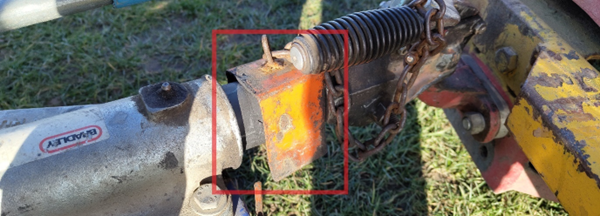
4 — This is used to allow you to reverse the winch. It must be in place whilst reversing or the winch’s wheel brakes will activate. Remember to remove this before moving off!
Interior — What Does All This Do?
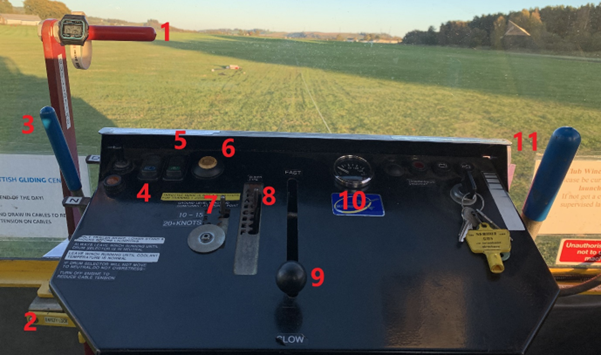
1. Guillotine — When the guillotine lever is pulled, two large and heavy compressed springs ram a sharp piece of metal into the cables, cutting them. The guillotine should only be used when the glider is unable to release, which is very rare.
2. Guillotine Safety Lock — You should ensure that the safety lock is in place, including during launches. If you are unlucky enough to need to use the guillotine, it is easy to flick this off.
3. Gear — The winch should be kept in Neutral until the ‘TAKE UP SLACK’ command is issued by the launch point. Once in Drive, the winch will start slowly reeling in the cable selected using the drum selector (see below).
4. Headlight Switch — When pressed, a headlight on the top of the winch is turned on. At Portmoak, we don’t have an official use for this, but you could probably use it to get the launch point’s attention if required.
5. Fan Switch — Turns on a fan that is located just above and behind your head. The fan’s air is heated by the engine’s radiator. Up is high speed, middle is off, down is low speed.
6. Siren Switch — The winch is fitted with a painfully loud siren which seems to be louder than the one fitted at the launch point. You can use this to get someone’s attention (e.g., whilst reeling in a cable).
7. Surface Wind Speed Selector — This selector moves the throttle guide based on the current surface headwind component. The first notch is 0 to 10 knots, second is 10 to 15 knots, third is 15 knots and higher.
8. Throttle Guide Selector — This selector also moves the throttle guide based on the glider type being launched. There is a sheet of paper in the winch with a list of different glider types and their recommended launch setting, from A+ to F. Keep in mind that the throttle guide is exactly that: a guide. It is not a replacement for the winch driver’s best judgement. You can always push through the throttle guide’s gate if you need more power.
9. Throttle — This lever is self-explanatory. When the lever is closest to you, the winch’s engine idles. When the lever is pushed away, the winch’s engine revs and the speed of the cable increases. Idle (and no more) should be used for ‘TAKE UP SLACK’.
10. Coolant Temperature — Displays the current temperature of the coolant fluid. You must wait for the winch to warm up before the first launch. Around 50°C should usually suffice.
11. Drum Brake — The drum brake can be used to slow down the cable whilst the winch is in Neutral. It’s not amazingly effective, so when bringing the cable back in, allow the cable to slow down in good time.
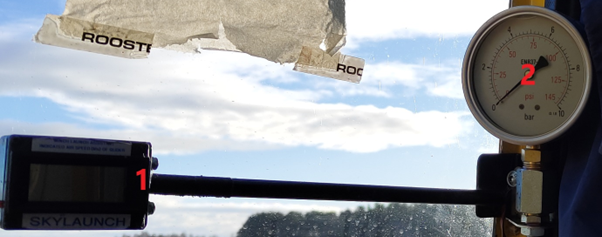
1. Launch Assist — Some gliders are fitted with a Launch Assist transmitter which broadcasts the aircraft’s indicated airspeed (IAS) during a winch launch. This display is connected to a receiver, but it can be up to 2 seconds out-of-sync. Launch Assist should not be solely relied upon and is only an additional aid – it can, however, be very helpful when launching an early student who may struggle to stay stable during the launch.
2. Transmission Pressure Gauge — The gauge displays the pressure the cables are exerting on the winch’s transmission. This gauge is discussed in more detail in a later section, but for now, know that it can be a very good tool for controlling the glider’s speed in the full climb.
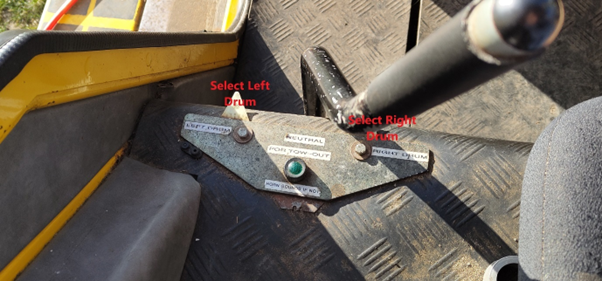
The handle on the left-hand side of the winch’s cabin is used to switch between the left drum, neutral (middle) and right drum.
Engine Compartment
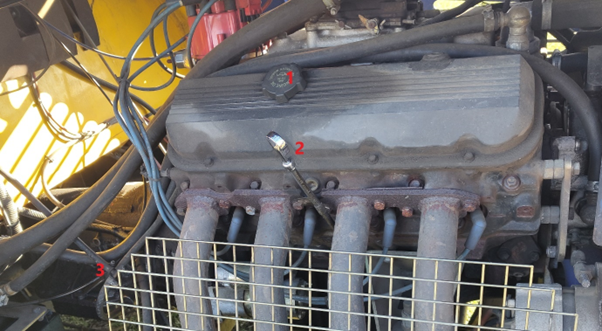
1. Oil Filler Cap — Use this to top-up the winch’s oil.
2. Oil Dipstick — Use this to check the winch’s oil levels. It should be somewhere in between the ‘Add ¼’ and ‘Full’ markers.
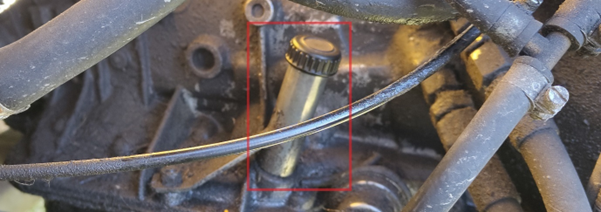
3. Transmission Fluid Dipstick — There is a small screw-on dipstick here which can be used to check the transmission fluid levels.
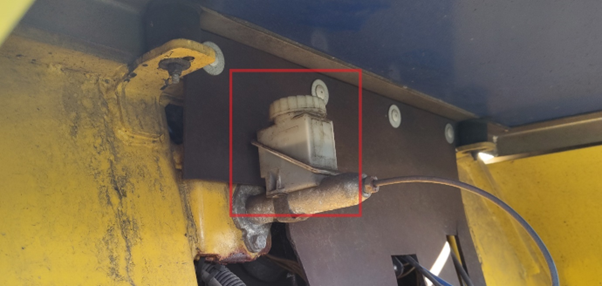
Finally, this is the brake fluid reservoir. Ensure there is brake fluid in it!
